Today we’ve got a new writer here at technogog, her name is Alyssa Choiniere and she’s got quite a bit of writing experience being published online and in print media. I’ve decided to bring a few more people on board to help us out with more content, more articles and such, so you should be seeing more new names and new content appearing soon. If you wish to know more about Alyssa you can visit her personal site HERE -Kristofer
After all the hype between Vista versus Mac, some Vista users may feel they missed the best technological innovations of our decade. This is just not so. Mac just has better marketing people. Vista skimped on the marketing budget to make good software. So before you trade in your computer for a Mac, read these tips to learn how Vista can simplify your life, leaving you more free time for its fun and exciting features.
1.) Managing Your Documents
If your folders are disorganized, Vista includes a new option to find your important documents and programs faster by enabling Quick Search.
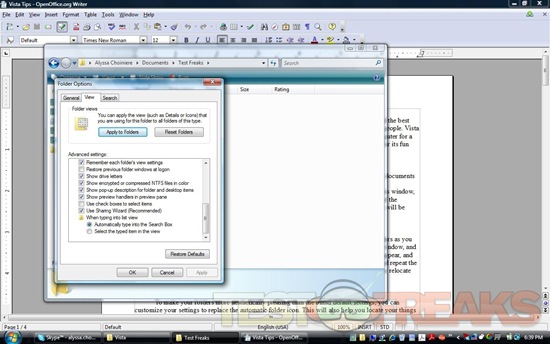
To enable this option, go to any folder and click “Organize” on the top left. From this window, select “Folder and Search Options,” then click the “View” tab. Scroll down to the bottom of the available options and select “Automatically type into the search box,” and your documents will be more readily accessible during searches.
2.) Getting Organized
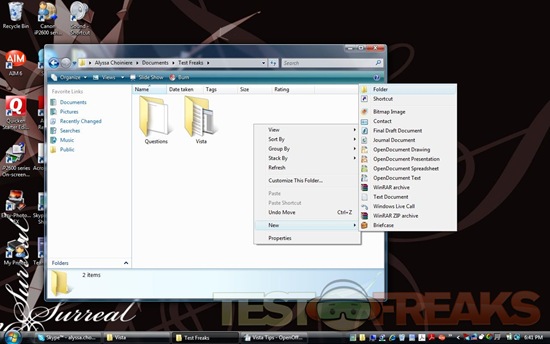
To further organize your documents, create individual folders and as many sub-folders as you want. To create a new folder, simply right click in the white area in the “My Documents” window, and drag the cursor down to “New.” Scroll over to “Folder,” the top option. A new folder will appear, and you can name it by typing into the blue area. To create a sub-folder, open the new folder and repeat the previous steps. If you create too many sub-folders, you may need to use the previous step to relocate your documents.
3.) Personalizing Your Folders
To make your folders more aesthetically pleasing than the bland default settings, you can customize your settings to replace the automatic folder icon. This will also help you locate your things more quickly, by scanning the images.
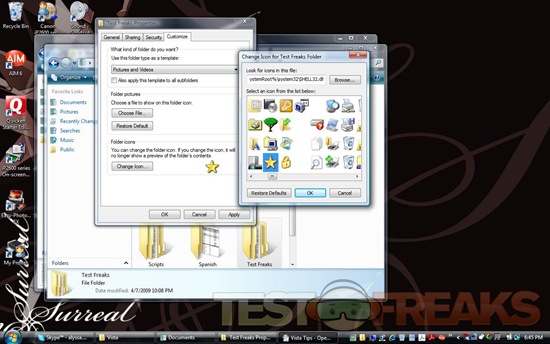
To replace the folder icon, select the folder you wish to customize and open “My Documents.” Then select “Organize.” Scroll down to “Properties” and go over to the “Customize” tab. Go to the bottom of the window and select “Change Icon.” You can choose from the available icons, or select “Browse” in the same box, and select a picture from your computer to use as an icon.
4.) Customize for Visual Impairment
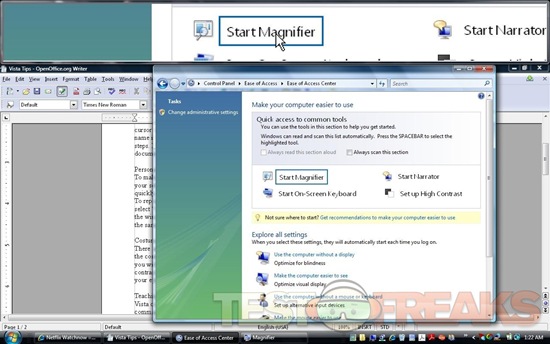
There are several options on Vista to make your computer easier to read. To find these options, go to the control panel and select “Ease of Access Center,” then “Make the Computer Easier to See.” Here, you will find a narrator to read texts and all actions of the computer, a setting to turn on high color contrast, and a magnifier to enlarge selected texts. Check any boxes under this section to be easy on your eyes.
5.) Teaching Your Computer to Listen
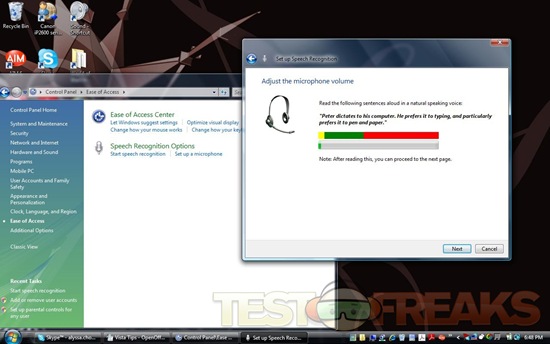
Vista comes with a speech recognition option, so that you can train your computer to accept voice commands. To access this program, go to the “Ease of Access Center” in the control panel. You will be given a tutorial. You may also use this feature to transcribe audio to text in a document. You may also teach the computer talk back by selecting the “Text to Speech” option at the left side of the window.
6.) Recording Sound
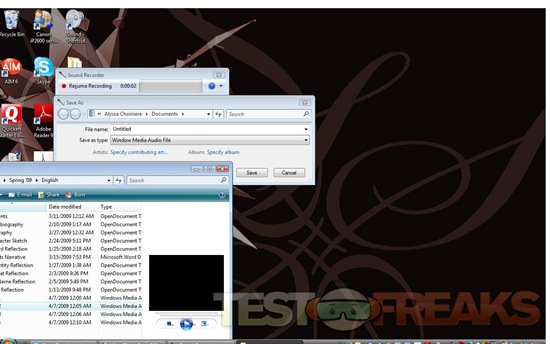
Vista includes a sound recording program which can be accessed under the start menu. To record voice, just click “start recording.” To reconfigure your audio and microphone settings, go to the control panel, and select “Hardware and Sound.” Then click “Sound” and adjust the levels. Once you are done recording, click “Stop Recording,” and your documents will appear. Name the file, and it will be saved as a .wav or .wma, Windows Media Audio File. The file can be e-mailed or downloaded to a thumb drive for play back.
7.) Protecting Files
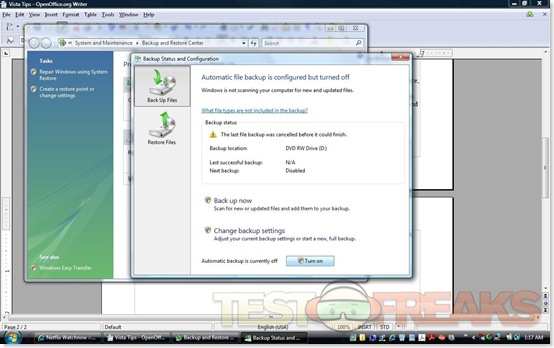
To protect your documents from being lost forever in a technological black hole, set up automatic backup on your computer. Go to the start menu and select “Backup and Restore Center.” Select “Change Settings” under the first option, and select the location you would like your files saved. You may save them on a CD, hard drive, or online. You may set an automatic backup by selecting the “Turn On” under the blue “Change Settings” option. The files will be backed up weekly to the location of your choice.
8.) Protecting Your Kids
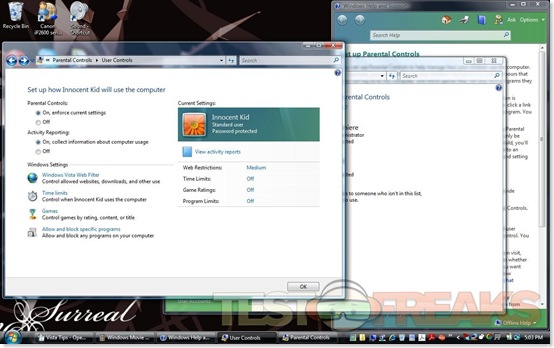
Vista comes with an option to control when, how, and how often your children use the computer. To access parental controls, go to the control panel under the start menu and select “User Accounts and Family Safety.” You may be guided through the system by selecting the “What Can I do With Parental Controls?” button, or simply select the account you would like to monitor. After you select the other user, you may prohibit certain game ratings and content, set a time limit for computer usage, and even read activity reports as frequently as daily.
9.) Meetings From Your Computer
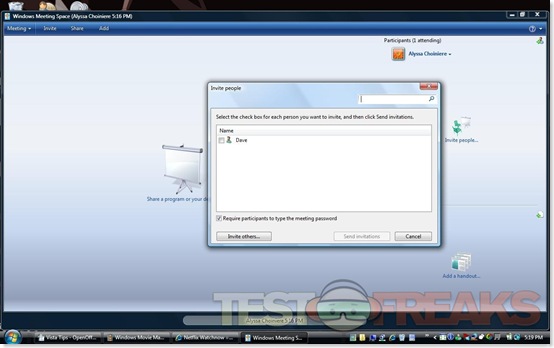
Windows Meeting Space enables you to have a virtual meeting from anywhere. No more listening to monotone bosses explain logistics. Just go to the start menu of your Vista and click “Windows Meeting Space.” Here, you can join a current meeting, or set up your own. Send out invitations by clicking “Invite” at the top of the screen, and a list of other users will appear. The users must be given a password to attend. Once the participants are invited, you can share your desktop by selecting the clipboard, or share handouts by clicking “Share.”
10.) Movie Maker
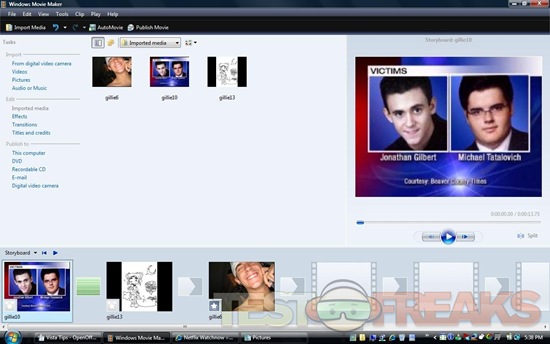
Become a director from your computer! Windows Movie Maker is found in the start menu, and allows you to make movies from files or camera. You may use these videos to show off your family to your neighbors, or show off your portfolio to a boss. You can even add music and fancy transitions, all by selecting the options on the left hand side of the menu. You may select an automatic style from “Auto Movie,” or create your own effects.
To satiate a creative spell, you can even create a cartoon. Draw your characters in paint, save the files, and drag the images to the bottom of the screen. To add transitions, select the transitions option and drag the effect you want into the space between pictures. Effects can be dragged the the bottom corner of each image. Add music from your streamed collection, hit play, and envision your name in lights.
11.) Picture Perfect
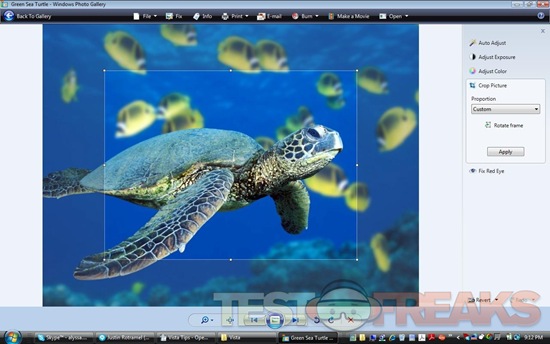
Vista comes with a low-key version of photoshop called “Windows Photo Gallery,” found in programs. It only includes the necessities for photo editing, but for an amateur photographer, it gets the job done.
To edit photos, select fix at the top of the screen. The easiest option is “Auto Adjust,” but it won’t necessarily give you the desired effect. You may crop the picture by dragging a box around the part of the picture you want to keep, and fix red eye by selecting the red eyes. For brightness and color, just drag the cursor until the photo looks satisfactory.
12.) Windows Media Player
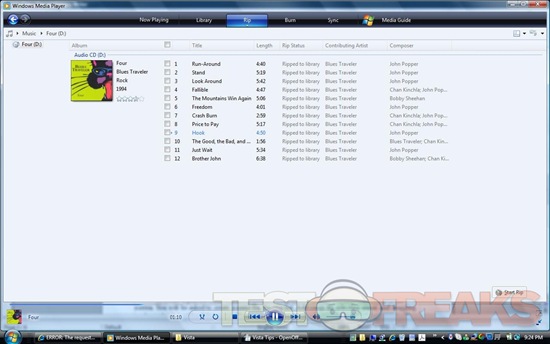
With Windows Media Player, you can perform all the necessary functions to transport your CD collection onto your computer, and revert it to digital format. Located in programs, you can upload music onto the computer by inserting a CD or mp3 player, and clicking “Rip” on the top of the screen. You can burn this onto a blank CD by selecting the music, inserting a blank CD, and clicking “Burn.” Transfer your music to an mp3 player by plugging it in to the USB port and clicking “Sync.”
13.) Organizing Your Music
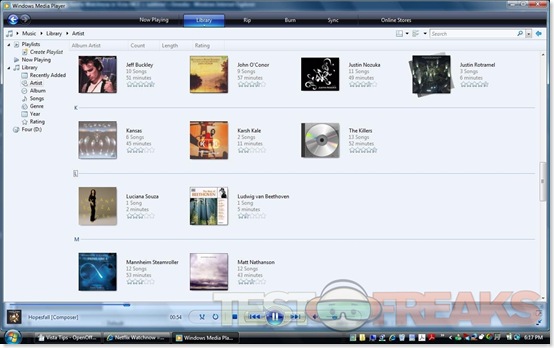
Windows Media Player will attempt to organize your music collection logically, but once it starts labeling The Beatles and Disturbed in the same genre folder, it’s time to step in.
To relabel the genres of your music, simply right click on the genre name and type in the genre. You can use any genre, not just the broad labels the player uses. This will help you find the music to suit your mood, and allow you to show off your range of tastes.
The player may further disorganize your collection by lumping all artists on a mix CD into one “various artists” folder, or “unknown.” You may avoid confusion by relabeling the artists under the album name, or naming each track individually. To change the label, right click the section you would like to change, and type the label.
You may also organize your music by ratings. You can rate individual songs between one and five stars, and later, select music by rating from the left side of the screen.
14.) Media Guide
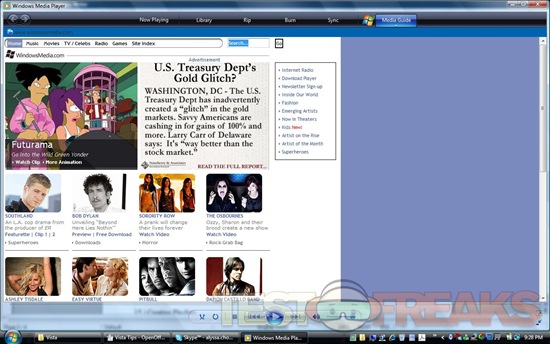
The Media Guide, accessed from the Windows Media Player, allows you to access various artists’ music, videos, and online music downloads. You may stream music straight from Napster or other websites into the player. You can also view top artists, listen to music samples, and watch music videos. VidZone, available through the Media Guide, lets you play thousands of music videos from the computer. You may also access downloads and add-ons from the Media Guide.
15.) Creating Playlists
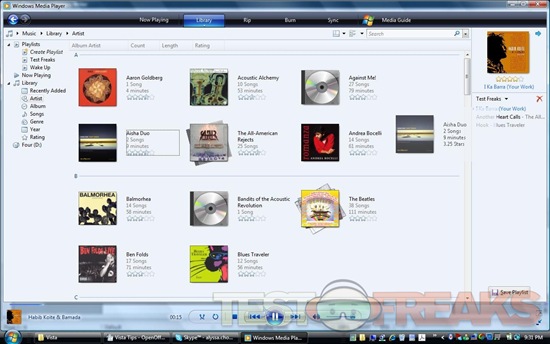
To create a playlist from Windows Media Player, select “Create Playlist,” on the top of the screen. You will be asked to create a name for the playlist. Add songs by selecting music and dragging tracks to the right side of the screen. You can reorder the tracks after you have added them, or shuffle during play by clicking the playlist name a scrolling down to “shuffle.”
16.) Windows Media Center
Windows Media Center is one of the most exciting and useful tools of the Vista. Here, you can watch TV, catch up on news headlines, listen to music, and play DVDs at the click of a button. It is accessed through the programs menu.
17.) Internet TV
Windows Media Center automatically streams TV shows to your computer. To access this, go to the Windows Media Center, select “TV and Movies,” and scroll over to “Internet TV.” Here, you will be able to view the top picks, which are updated continually. Selections range from the History Channel to the making of South Park.
18.) Sports
If you missed the game last night, you can view the scores, stats, and plays your friends are talking about through the media center. Open the player, go to “TV and Movies,” and select “Sports.” Scroll over to view scores for every national seasonal sports team.
19.) Fantasy Sports
The Media Center also allows you to build your own fantasy teams. To start your own, go to “TV and Movies” in the Windows Media Player, select sports, and scroll to the last option, “Players.” You may select a league in the MLB, NBA, NHL, or NFL. Select the “Add Players” option, and pick your team from every current player in the league, by position. You may save the team, and check back to view the stats.
20.) News
Windows Media Center streams news from MSNBC. You can constantly keep track of breaking news developments by watching news clips and reading headlines. You can also check the weather, watch feature news stories, and gage the health of the economy. To watch the news, go to “TV and Movies,” and scroll over to “News.”

14 comments for “20 Functions of Vista to Improve Your Life”